Foolowing are the steps for creating a silver light webpart for SharePoint 2010.
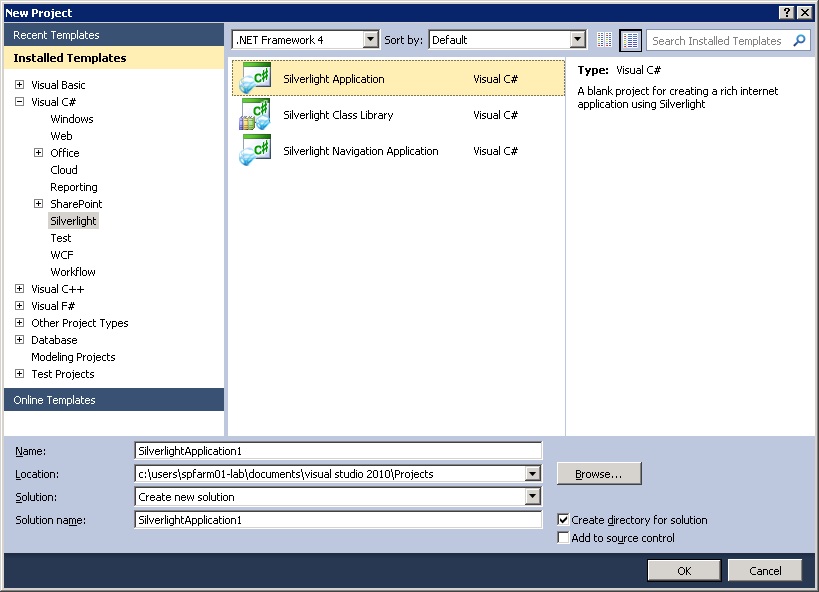
1) Create a new project with the template "Silverlight Application"
 2) Un-check "Host the Silverlight application in a new web site.
3) Add the following references from this path "C:\Program Files\Common Files\Microsoft Shared\Web Server Extensions\14\TEMPLATE\LAYOUTS\ClientBin".
Microsoft.SharePoint.Client.Silverlight.dll
Microsoft.SharePoint.Client.Silverlight.Runtime.dll
4) Add this reference as well System.Windows.Controls.Data.Input
5) After adding the reference, the solution pane should look like this:

6) Next step is to design the XAML:
< UserControl x:Class="SilverlightApplicationHelloWorld.MainPage"
xmlns="http://schemas.microsoft.com/winfx/2006/xaml/presentation"
xmlns:x="http://schemas.microsoft.com/winfx/2006/xaml"
xmlns:d="http://schemas.microsoft.com/expression/blend/2008"
xmlns:datainput="clr-namespace:System.Windows.Controls;assembly=System.Windows.Controls.Data.Input"
xmlns:mc="http://schemas.openxmlformats.org/markup-compatibility/2006"
mc:Ignorable="d"
d:DesignHeight="300" d:DesignWidth="400" >
< Grid x:Name="LayoutRoot" Background="White">
< Button Click="btnLoadSite_Click" Content="Load Site" Height="23" HorizontalAlignment="Left" Margin="25,12,0,0" Name="btnLoadSite" VerticalAlignment="Top" Width="75" >< /Button >
< Canvas Name="canvasLabels" Visibility="Collapsed" >
< datainput:Label Content="Site: " Height="22" HorizontalAlignment="Left" Margin="41,55,0,0" Name="label1" VerticalAlignment="Top" Width="73" >< /datainput:Label >
< datainput:Label Height="22" HorizontalAlignment="Left" Margin="120,55,0,0" Name="label2" VerticalAlignment="Top" Width="233" >< /datainput:Label >
< datainput:Label Content="Url:" Height="24" HorizontalAlignment="Left" Margin="41,84,0,0" Name="label3" VerticalAlignment="Top" Width="73" >< /datainput:Label >
< datainput:Label Height="24" HorizontalAlignment="Left" Margin="120,84,0,0" Name="label4" VerticalAlignment="Top" Width="233" >< /datainput:Label >
< datainput:Label Content="Description" Height="26" HorizontalAlignment="Left" Margin="41,116,0,0" Name="label5" VerticalAlignment="Top" Width="73" >< /datainput:Label >
< datainput:Label Height="26" HorizontalAlignment="Left" Margin="120,116,0,0" Name="label6" VerticalAlignment="Top" Width="233" >
< /datainput:Label >
< /Canvas >
< /Grid >
< /UserControl >
7) Add the following in code behind:
8a) Directly deploy to "Client Bin" folder.
Change the "Output Path" to "C:\Program Files\Common Files\Microsoft Shared\Web Server Extensions\14\TEMPLATE\LAYOUTS\ClientBin" in the Solution -> Property page.

 8b) Other approach is add the XAP to a document libratry, and give the path in Silverlight webpart
1) Create a new project with the template "Silverlight Application"
3) Add the following references from this path "C:\Program Files\Common Files\Microsoft Shared\Web Server Extensions\14\TEMPLATE\LAYOUTS\ClientBin".
Microsoft.SharePoint.Client.Silverlight.dll
Microsoft.SharePoint.Client.Silverlight.Runtime.dll
4) Add this reference as well System.Windows.Controls.Data.Input
5) After adding the reference, the solution pane should look like this:

6) Next step is to design the XAML:
< UserControl x:Class="SilverlightApplicationHelloWorld.MainPage"
xmlns="http://schemas.microsoft.com/winfx/2006/xaml/presentation"
xmlns:x="http://schemas.microsoft.com/winfx/2006/xaml"
xmlns:d="http://schemas.microsoft.com/expression/blend/2008"
xmlns:datainput="clr-namespace:System.Windows.Controls;assembly=System.Windows.Controls.Data.Input"
xmlns:mc="http://schemas.openxmlformats.org/markup-compatibility/2006"
mc:Ignorable="d"
d:DesignHeight="300" d:DesignWidth="400" >
< Grid x:Name="LayoutRoot" Background="White">
< Button Click="btnLoadSite_Click" Content="Load Site" Height="23" HorizontalAlignment="Left" Margin="25,12,0,0" Name="btnLoadSite" VerticalAlignment="Top" Width="75" >< /Button >
< Canvas Name="canvasLabels" Visibility="Collapsed" >
< datainput:Label Content="Site: " Height="22" HorizontalAlignment="Left" Margin="41,55,0,0" Name="label1" VerticalAlignment="Top" Width="73" >< /datainput:Label >
< datainput:Label Height="22" HorizontalAlignment="Left" Margin="120,55,0,0" Name="label2" VerticalAlignment="Top" Width="233" >< /datainput:Label >
< datainput:Label Content="Url:" Height="24" HorizontalAlignment="Left" Margin="41,84,0,0" Name="label3" VerticalAlignment="Top" Width="73" >< /datainput:Label >
< datainput:Label Height="24" HorizontalAlignment="Left" Margin="120,84,0,0" Name="label4" VerticalAlignment="Top" Width="233" >< /datainput:Label >
< datainput:Label Content="Description" Height="26" HorizontalAlignment="Left" Margin="41,116,0,0" Name="label5" VerticalAlignment="Top" Width="73" >< /datainput:Label >
< datainput:Label Height="26" HorizontalAlignment="Left" Margin="120,116,0,0" Name="label6" VerticalAlignment="Top" Width="233" >
< /datainput:Label >
< /Canvas >
< /Grid >
< /UserControl >
7) Add the following in code behind:
using System;
using System.Collections.Generic;
using System.Linq;
using System.Net;
using System.Windows;
using System.Windows.Controls;
using System.Windows.Documents;
using System.Windows.Input;
using System.Windows.Media;
using System.Windows.Media.Animation;
using System.Windows.Shapes;
using Microsoft.SharePoint.Client;
namespace SilverlightApplicationHelloWorld
{
public partial class MainPage : UserControl
{
public MainPage()
{
InitializeComponent();
}
private ClientContext context = null;
private Web web = null;
private delegate void UpdateUIMethod();
private void btnLoadSite_Click(object sender, RoutedEventArgs e)
{
context = ClientContext.Current;
web = context.Web;
context.Load(web, w => w.Title, w => w.Description, w => w.ServerRelativeUrl);
context.ExecuteQueryAsync(OnSiteLoadSuccess, OnSiteLoadFailure);
}
private void OnSiteLoadSuccess(object sender, ClientRequestSucceededEventArgs e)
{
UpdateUIMethod updateUI = LoadSiteData;
this.Dispatcher.BeginInvoke(updateUI);
}
private void OnSiteLoadFailure(object sender, ClientRequestFailedEventArgs e)
{
MessageBox.Show("Request Failed: " + e.Message + ", Stack Trace:" + e.StackTrace);
}
private void LoadSiteData()
{
canvasLabels.Visibility = System.Windows.Visibility.Visible;
label2.Content = web.Title;
label4.Content = web.ServerRelativeUrl;
label6.Content = web.Description;
}
}
}
8) For deployment there are two steps:using System.Collections.Generic;
using System.Linq;
using System.Net;
using System.Windows;
using System.Windows.Controls;
using System.Windows.Documents;
using System.Windows.Input;
using System.Windows.Media;
using System.Windows.Media.Animation;
using System.Windows.Shapes;
using Microsoft.SharePoint.Client;
namespace SilverlightApplicationHelloWorld
{
public partial class MainPage : UserControl
{
public MainPage()
{
InitializeComponent();
}
private ClientContext context = null;
private Web web = null;
private delegate void UpdateUIMethod();
private void btnLoadSite_Click(object sender, RoutedEventArgs e)
{
context = ClientContext.Current;
web = context.Web;
context.Load(web, w => w.Title, w => w.Description, w => w.ServerRelativeUrl);
context.ExecuteQueryAsync(OnSiteLoadSuccess, OnSiteLoadFailure);
}
private void OnSiteLoadSuccess(object sender, ClientRequestSucceededEventArgs e)
{
UpdateUIMethod updateUI = LoadSiteData;
this.Dispatcher.BeginInvoke(updateUI);
}
private void OnSiteLoadFailure(object sender, ClientRequestFailedEventArgs e)
{
MessageBox.Show("Request Failed: " + e.Message + ", Stack Trace:" + e.StackTrace);
}
private void LoadSiteData()
{
canvasLabels.Visibility = System.Windows.Visibility.Visible;
label2.Content = web.Title;
label4.Content = web.ServerRelativeUrl;
label6.Content = web.Description;
}
}
}
8a) Directly deploy to "Client Bin" folder.
Change the "Output Path" to "C:\Program Files\Common Files\Microsoft Shared\Web Server Extensions\14\TEMPLATE\LAYOUTS\ClientBin" in the Solution -> Property page.

Now, add a Silverlight webpart on a sharepoint page and set the URL as
"_layouts/ClientBin/SilverlightApplicationHelloWorld.xap".

1 comment:
Sharepoint Consulting professionals rely on Microsoft Office Sharepoint 2010 versions to help organizations gain their business goals by taking advantage on significant sharepoint BI potentialities.
More...
Sharepoint Consulting
Post a Comment