Showing posts with label Infopath. Show all posts

Sunday, August 21, 2011

Creating UDC in InfoPath forms

During development there is common requirement is to create InfoPath forms, those can be deployed into multiple servers. Once you completed the development in local DEV, the forms need to deploy in Stage and Prod. Here an issue arises, the connection. Since the path of different servers are different one need to create 'Universal Data Connection' (UDC) 


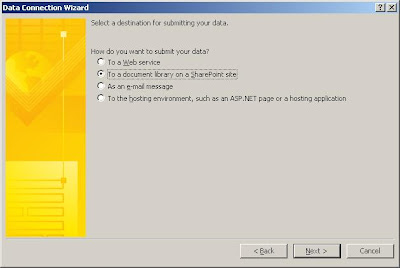
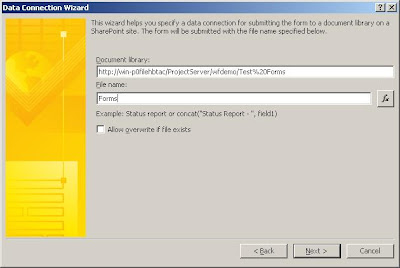
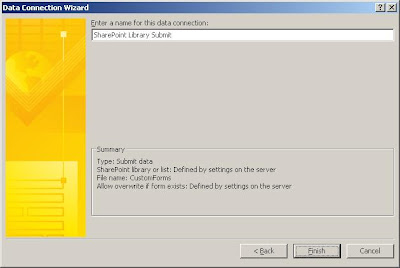
1) Create a connection for submit data, and follow the wizard

2) Create a Connection Library, then click on the 'Convert' button, this will generate one XML file. Specify a name of the connection with extension UDCX

3) After creating the UDCX file, on the InfoPath form, add a new connection and browse all the connections on the server.

4) Important, for each server, Staging, Prod etc you have to create data connection file with the same name. In this example submit.udcx. The forms will pick dynamically the connection based the respective servers.


Wednesday, June 9, 2010

Re-publish an InfoPath Template to an existing list

Recently I made a goofed-up in a SharePoint list where an InfoPath form was published. As we all know that, if we publish an InfoPath form to a library, the next time onwards the publishing wizard remember everything and you only have to click next.


But when I try to re-published a similar template from a different site to an existing library, the metadata of that list are gone. Also I have figure out that the internal names of  "Promoted Properties" are also changed. Say, earlier we have a field called "Request" now it becomes "Request1".


To avoid these type of problem, you need to map the column when published. 

Saturday, May 22, 2010

Updating Date and Integer type fileds in InfoPath programmatically

From the title of the topic seems that this task should be easy! But to my own surprise I find it very difficult and time consuming activity.

The Task:
We are having a InfoPath form Template, that is already published in a SharePoint Form Library. Now, We have to create the InfoPath form dynamically and submit the form in the SharePoint library. This process was described earlier in this post.


Now, the problem is the InfoPath form contains certain Date and Integer data types. And I have a C# application to do the task.

First Problem:
If I have to do this task inside InfoPath managed codes using VSTA (Visual Studio Tools for Application), the following piece of can be used:

XPathNavigator root = MainDataSource.CreateNavigator();
XPathNavigator nameNode = root.SelectSingleNode("/my:myFields/my:Name", NameSpaceManager);
nameNode.SetValue("newvalue");

But, I am not using VSTA and have to navigate the XML node programmatically. The "NameSpaceManager" only available inside InfoPath managed codes only. Therefore the "NameSpaceManager should create first in the code:

public XmlNamespaceManager InitNamespaceManager(XmlDocument xmlDOMDoc)
{

XmlNamespaceManager xnmMan;
xnmMan = new XmlNamespaceManager(xmlDOMDoc.NameTable);

foreach (XmlAttribute nsAttr in xmlDOMDoc.DocumentElement.Attributes)
{
     if (nsAttr.Prefix=="xmlns")
         xnmMan.AddNamespace(nsAttr.LocalName,nsAttr.Value);
}
return xnmMan;
}

XmlNamespaceManager NamespaceManager = InitNamespaceManager(XMLDoc);


This NameSpaceManager is required to resolve any NameSpace related issues at the time of creating XPathNavigation.


Second Problem:

This problem raised when I updated the Date and Integer fields of the InfoPath file in my code. After submission of the file, when I try to open, the following error message displayed:


After googled some time, I learnt that, XML only understand a single date format. That is "yyyy-MM-dd". You have to pass the dates in this format only. So, I used:

newNode.SetValue(XmlConvert.ToString(DateTime.Now, "yyyy-MM-dd"));

Third Problem:

After putting that dates in the correct format, I was a bit confident that the problem has been resolved. But the previous error message was again shown me, i.e. "Schema validation error".

Fortunately, I got this and this on the Internet, and fixed the entire problem finally.

XmlNamespaceManager NameSpaceManager = InitNamespaceManager(XMLDoc);

XPathNavigator nav = xd.CreateNavigator();

//For a text field value
nav.SelectSingleNode("/my:myFields/my:Requestor", NameSpaceManager).SetValue("SampleData");

//For a date Field
XPathNavigator navTRDDate = nav.SelectSingleNode("/my:myFields/my:TRDDate", NameSpaceManager);

if (navTRDDate.MoveToAttribute("nil", "http://www.w3.org/2001/XMLSchema-instance"))
   navTRDDate.DeleteSelf();

navTRDDate.SetValue(DateTime.Now.ToString("yyyy-MM-dd"));

Sunday, May 2, 2010

Get User Details without writing any code in a InfoPath Form

Hi All,

In recent work I need to show the currently logged in user in a InfoPath form. At first I thought of writing some codes, but later I encounter this post claytoncobb to figure out a complete no code solution.

Here, I am going to use the SharePoint web service UserProfileService (http://ServerName/_vti_bin/UserProfileService.asmx). The design of my form look like this:

Now, For creating the data connection, following steps need to perform:
  1. With InfoPath opened go to Tools > Data Connections, and click 'add...' to add a new data connection to the form. This opens up the Data Connection Wizard.
  2. We want to receive data from the WS about the current user, so choose receive data' and click next.
  3. Our data source is a WS so choose 'Web Service' and next.
  4. Now you will have to point the wizard to the WS. Type an address similar to this: http://ServerName/_vti_bin/UserProfileService.asmx  and click next.
  5. Here you get a list of all methods for that WS, choose GetUserProfileByName and click next.
  6. In this screen you can specify what parameters are sent to the method, we are relying on the method's ability to return the current user name if no value is passed to it, so we will leave this as is (no value is passed to the method) and click next.
  7. Click next and make sure 'Automatically retrieve data when form is opened' is checked.
  8. Finish the wizard.
The GetProfileByName method returns a PropertyData array. You can think of it as a repeating table of name and value pairs.
So Now that you have a data connection that can get the current users, you can use it values. In this example I will show the user's first name in a TextBox.

  1. Add a textbox to the form.
  2. Go to the first textbox's properties (double click it).
  3. In the 'Default Value' part, click the 'fx' button next to the 'Value' field. this opens up the formula builder dialog.


  4. Click 'Insert field or group'.

  5. In the data sources drop down, choose the GetUserProfileByName data source.
  6. Expand all groups under the 'dataFields' group, and choose the 'value' field. Don't click OK yet!


  7. With data 'value' field selected, click the 'Filter Data...' button and 'Add...'.
  8. In the first drop down (value) select 'Select a field or group...' and choose the 'Name' field under the 'PropertyData' group.

  9. Leave the middle drop down as is ('is equal to') and in the last drop down choose 'type a text...'.

     
  10. This is the part where you specify which property to put in the textbox. As we said the method returns multiple properties about the user. For this textbox we want to put the user's first name in, so type 'FirstName' (this is case sensitive!). I have included the property list you can use here (just below), so if you want some other property, just type its name instead.
  11. That's it, all we have to do is to confirm everything so Click 'OK' for every open dialog box until you are back in the design mode.
  12. click 'Preview' and see the wonder!
  13. If you want more details repeat steps 1-11 and enter different property names in step 10.
Gotcha:
After completing the above steps you might not able to see your data as expected. This means the form might show an empty field and you will be thinking where is the problem.

As we are accessing the user information form the profile object, all the values (like first name, last name etc) of a user should be defined there. From a SharePoint site you can click on a user link to see the detail information in UserDisp.aspx page.
 

Finally, here is the complete list of default profile properties get returned by the userprofileservice. I think they are pretty self explained:
UserProfile_GUID
AccountName
FirstName
LastName
PreferredName
WorkPhone
Office
Department
Title
Manager
AboutMe
PersonalSpace
PictureURL
UserName
QuickLinks
WebSite
PublicSiteRedirect
SPS-Dotted-line
SPS-Peers
SPS-Responsibility
SPS-Skills
SPS-PastProjects
SPS-Interests
SPS-School
SPS-SipAddress
SPS-Birthday
SPS-MySiteUpgrade
SPS-DontSuggestList
SPS-ProxyAddresses
SPS-HireDate
SPS-LastColleagueAdded
SPS-OWAUrl
SPS-ResourceAccountName
SPS-MasterAccountName
Assistant
WorkEmail
CellPhone
Fax
HomePhone


Monday, April 19, 2010

Programmatically create a new form in the Form Library in SharePoint

As you will learn that, creating a new form from a from library in SharePoint is not that easy as compared to Document Library. Because in a Form Library the template stored in XSN formate and you need to first extract the xml out of it.

In the first section, we will create the instance of Form Library of a SharePoint site.

SPDocumentLibrary list = null;
using (SPSite objSite = new SPSite("http://soumyendra:555/Forms"))
{
using (SPWeb objWeb = objSite.OpenWeb())
{
list = objWeb.Lists["Person Address"] as SPDocumentLibrary;
}
}

here "Person Address" is the name of the form library.

Next we will pick the template file attached to the form library. We can get that by using SPList.DocumentTemplateUrl property.

Then we need to extract the template file (XSN) using some extract utility. Here I am using CabinetExtractAndCompress. You can download the utility from Code Project and use it.

Then, by using the utility we first create a physical directory and extract the XSN file. After that, by using File Stream object, we read the file content and get the byte array.

byte[] data = null;
SPFile file = list.ParentWeb.GetFile(list.DocumentTemplateUrl);
Extract cab = new Extract();
string szFolder = string.Concat(System.IO.Path.GetTempPath(), list.Title, "\\");

if (!Directory.Exists(szFolder))
Directory.CreateDirectory(szFolder);

cab.ExtractStream(file.OpenBinaryStream(), szFolder);
FileStream fs = new FileStream(szFolder + "template.xml", FileMode.Open);
try
{
data = new byte[fs.Length];
fs.Read(data, 0, data.Length);
}
finally
{
fs.Close();
}


Next, we will have the MomoryStream to convert the byte array to a XML document. This xml document can be used for updating the values of the fields in the document.

MemoryStream inStream = new MemoryStream(data);
XmlTextReader reader = new XmlTextReader(inStream);
XmlDocument xd = new XmlDocument();
xd.Load(reader);
reader.Close();
inStream.Close();

string strLibraryUrl = "http://soumyendra:555/Forms/" + list.DocumentTemplateUrl;


This is a very important step. Since we are using a different file as a source compared to the file uploaded in the form library, we need to update the reference as well.

for (int index = 0; index <>
{
if (xd.ChildNodes[index].Name == "mso-infoPathSolution")
{
string sHref = string.Format("href=\"{0}\"", strLibraryUrl);
Regex regEx = new Regex("href=\".*\"");

if (regEx.IsMatch(xd.ChildNodes[index].Value))
{
xd.ChildNodes[index].Value = regEx.Replace(xd.ChildNodes[index].Value, sHref);
}
else
{
xd.ChildNodes[index].Value = string.Concat(xd.ChildNodes[index].Value, sHref, ' ');
}
}
}

The following steps are for updating the fields in the InfoPath form. We need to loop through the child elements of the form and update the values of the form as required.

//gets the root element from the xml document XmlElement
root = xd.DocumentElement;
for (int index = 0; index <>
{
if (root.ChildNodes[index].Name == "my:Name")
{
root.ChildNodes[index].InnerText = "Somu";
}
else if (root.ChildNodes[index].Name == "my:Address")
{
root.ChildNodes[index].InnerText = "Delhi";
}
else if (root.ChildNodes[index].Name == "my:Phone")
{
root.ChildNodes[index].InnerText = "123456";
}
else if (root.ChildNodes[index].Name == "my:Email")
{
root.ChildNodes[index].InnerText = "somu@gamil.com";
}
}

The final step is to save the file back in the form library. For this we create the instance of the list and Add the file as follows.

using (SPSite objSite = new SPSite("http://soumyendra:555/Forms"))
{
using (SPWeb objWeb = objSite.OpenWeb())
{
// saves the XML Document back as a file
System.Text.ASCIIEncoding encoding = new System.Text.ASCIIEncoding();
SPFile newFile = objWeb.Folders["Person Address"].Files.Add("Somu.xml", (encoding.GetBytes(xd.OuterXml)), true);
}
}


The above post created with the help of Daniel Halan. Please let me know if you have ant doubts on the above mention steps.

Thanks,
Soumyendra